Save money, build skills, use up scrap, and have fun!
Common sense tips for all shop-made devices:
- Do a power-off "walk-thru" before using any new device, as stopping or letting go in mid stroke can be dangerous. If you aren't totally confident, and/or don't understand the physics of the operation, don't do it!
- Always know where both hands and all body parts will be at all phases of the operation. Think what would happen if the workpiece were to disappear and make sure momentum will not carry body parts into blades. Plan hand positions to carry you away from cutters if you slip.
- Dimensions and shapes of the items on this page are usually not critical, except handles must always have enough clearance room to keep skin as far as possible from cutting tools. Always have a safe place to put all fingers before starting the cut.
- Never use metal fasteners, such as screws, staples, or brads, anywhere a cutting edge can reach. Use dowels, biscuits, plastics, and/or glues to protect your sharp edges.
|
 HEY YOU! READ THIS! HEY YOU! READ THIS!
Woodworking equipment cuts flesh and bone much better than wood. It can also grab stock and throw it with enough velocity to penetrate walls, generate carcinogenic dust and blinding chips, and permanently damage your vision and hearing. Use your most important tool, your brain, and take the time to understand your tools. Protect yourself well and enjoy life for a good long time. Seek local hands-on safety instruction. All of the information on this page is provided with the understanding that you take full responsibility for your own actions, and that you have the skill and experience to use the information safely.
|
 |
| Zero Clearance Insert w/ Splitter |
|
|
This item is easily made by using your existing insert as a pattern for a bearing guided router bit.
Leave the splitter off for a crosscut, bevel ripping, or dado version.
- Select appropriately thick cabinet grade plywood or MDF. The ideal thickness is slightly thinner than your existing plate, as the levelling screws will make if flush. I use 1/2" Baltic Birch and MDF scraps.
- Mount the insert to the stock using carpet tape, remove most of the waste with a band, jig, or coping saw, and rout to the pattern.
- Save the first blank insert as a pattern to more easily make future blanks.
- Drill appropriate holes and install #10 or 1/4" set screws (insert levellers) by threading them into holes pre-hardened with super glue. An insert that's level and flush is an accurate insert.
- To cut the slot: Install the blank insert in place over a fully lowered blade. Hold it in place with a large chunk of 4x4. Start the saw and gently raise the blade through the insert.
- Drill a hole so the insert can be easily removed from the saw.
- Stop here if you don't need a splitter on this insert. I don't install splitters on inserts intended to crosscut or dado.
- Reinstall the stock insert and use the slot you just cut to set the fence. Cut the splitter slot on the back end of the new insert.
- The splitter is hardwood (white oak on this example) planed to the exact thickness of the rip blade's kerf and glued into place. Take a look at the shape of the slot left by the round blade. Try to fit the vertical part to allow as much glue area as possible. Mine end up looking like they have a triangular tab matching the blade curve of the slot.
- Round or "vee" the front of the splitter with a rasp or sandpaper.
- Cut the splitter to a reasonable height based on the stock you'll usually cut. This prevents the extra tall splitter from interfering with push blocks when ripping narrower boards.
- Mark the insert with the specific blade it is designed to be used with.
- OPTIONAL - Spray the insert with the clear finish of choice. I don't usually bother.
- OPTIONAL - Wax the insert with paste wax. I do use wax.
|
 |
| Narrow Strip Ripper |
|
|
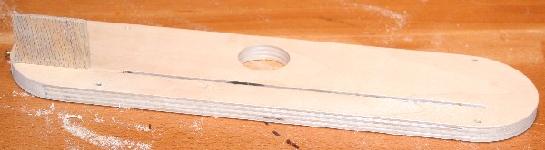
This item is easily made by using a bearing guided pattern bit around a shop made 1/4" hardboard pattern.
- Make the pattern from 1/4" hardboard (ex:// Masonite). None of the dimensions are all that critical. This one is about 12" long x 6" high with a 2" finger hole, I have others that are longer and shorter, but the shorter versions aren't really necessary. The curves are simply freehanded to connect the lines and aren't necessary. Straight lines and angles work just as well! The main idea is to keep your fingers far from the blade, so keep that in mind when laying the pattern out.
- Tape the pattern to 3/4" plywood with carpet tape. Saw away the big parts and rout to the pattern. Save the pattern for next time.
- Drill the finger / hanging hole
- Run a roundover over all of the "touch" edges, including the finger hole.
- While the tools are out, lather, rinse, and repeat until you make a bunch.
- Cut the notch on the bottom. My "hook" is usually cut to 5/8", then cut away shorter if I need to use the tool on thinner material.
To use this tool:
INSTALL A ZERO CLEARANCE INSERT AND SPLITTER. Set your fence for the desired rip width. Raise the blade so it's only 1/8 - 1/4" above the stock. With your fingers well clear of the cut (like through the hole in the tool?), use the tool to push the "keeper" piece between fence and blade. Keeper narrower than 3/4"? Let the blade slice the hook! Thin stock? Trim the hook!
Don't worry about using up the tool. You made a bunch of 'em at one sitting, and they're cheap! 
|
 |
| Long Push Block |
|
|
 |
| Push Blocks with Sacrifical Pads |
|
|
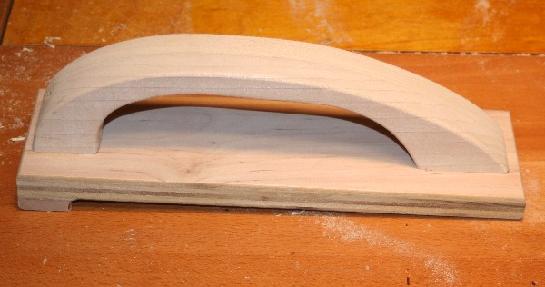
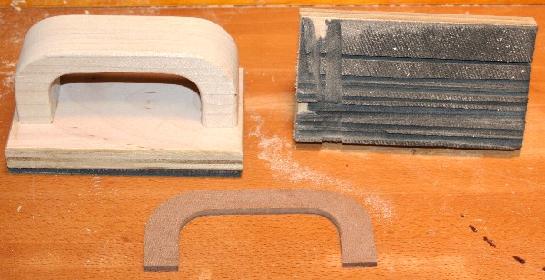
Push and Hold Down Blocks
- Make templates for handles from 1/4" hardboard. Dimension and shape are not critical. As usual, leave plenty of finger clearance if a saw blade should slice through the bottom plate!
- Trace the handles on 8/4 wood. I used (2) thicknesses of 4/4 poplar laminated together for the handles in the photos.
- Cut out the handles with a band or coping saw. Sand / scrape / plane them smooth.
- Roundover the edges for comfort.
- Make a bunch while the tools are set up.
- Attach the cloth side of rubberized mouse pad to MDF blocks using contact cement. Office supply stores often sell pads with their name on them for as little as $1!
- Attach the handles with wooden dowels and glue.
- (OPTIONAL) attach "push hooks" (See the long block") with wooden dowels.
- (OPTIONAL) chamfer the edges of the rubber to prevent chunking.
To replace the pad, simply scrape or sand the old pad off and contact cement a new one in place. If the pad seems to lose grip, rough it up with 60 grit.
The long, unpadded block makes a great "strong back" for jointing stock less than 3/4" thick. The shorter, grippy versions are excellent for ripping thin strips in thin stock, routing small parts, etc...
|
Shop Made Router Table
A simple MDF box! If you can build a cabinet, you can build this. The top is two 3/4" layers of MDF, glued up and laminated on both sides with Formica, edged with scrap hardwood (ash was used here). The fence assembly and plate insert are commercial products from Rousseau, available from all the usual woodworking sources. Customize the height to what's comfortable for you. The on/off switch is a duplex switch / outlet attached to an extension cord. Dust collection attaches to the fence and a 4" rear port. The optional miter slot was routed in after the fact, and can be added at any time.
| |
Table Saw Overhead Guard
Made of Lexan via Badger Pond plans. 3" PVC connector ties to 4" dust collection hose.
| |
|
|

